What is HTML?
The is the short introduction to creating an HTML document. HTML is a formal Recommendation by the W3C Consortium and is generally auppot by all the major browsers.
HTML stands for HyperText Markup Language, it is not a programming language; it is a markup language, used to tell your browser how to display the structure of the web pages. HTML document consists of a series of elements, which you use to display content into the browser in a certain way.
The Web browsers to present text and graphics by used HTML. The text includes markup tags such as <p> to indicate the start of a paragraph, and <p> to indicate the end of a paragraph.
HTML Editors
You can create and modified by using HTML editors. The editor is simple software, which is used to create and modify html document.
So many html editors are available for now days. We recommend using a simple text editor for learning html like Notepad or TextEdit.
Note:
You should use Notepad for learning and best practice.You can also use our online editor.
Creating First HTML Document
Many people still write HTML code by hand using tools such as NotePad on Windows, or TextEdit on the Mac
Step 1-> Open HTML Editor
Open Notepad or TextEdit editor according to your computer operating system either Window PC or Mac.
Step 2-> Write Html Code
Write some HTML code into Notepad like below exmple , or you can also copy the following example code and pest into Notepad.
Example
Example
<!DOCTYPE html>
<html>
<head>
<title>HTML Basic Tutorial - htmlreaders.com
</title>
</head>
<body>
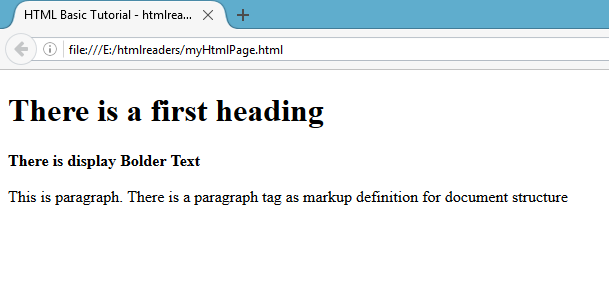
<h1> There is a first heading
</h1>
<strong>There is display Bolder Text
</strong>
<p> This is paragraph. There is a paragraph tag as markup definition for document structure
</p>
</body>
</html>
Note: This example using HTML 5 DOCTYPE ( <!DOCTYPE html>) .
Step 3 -> Save the HTML Page
Select Location
Save the file on your computer by Selecting File > Save as in the Notepad menu bar or press Ctrl+S and then select a location on your computer, where you want to the file. It might be either a folder or a drive.
Select file Name and Extension
Enter name of the file like this "index.html" or any other name you want to choose, it's up to you and click on the Save button.
Note:
1. You can save the file with .htm or .html extension. There is no difference between them.

2. For above Example we have chosen file name "myHtmlPage.html

3. For Mac computer users, before you can save a file with the ".html" extension, you will need to ensure that your document is formatted as plain text. For TextEdit, you can set this with the "Format" menu's "Make Plain Text" option.
Step 4 -> View Output in Your Browser
Go to the location where you have saved HTML file and then double click on file to view, or right click on the file > choose "Open with" and select your favorite browser which available in the computer.
The Output will look like this
Step 5 -> Explanation of an Output
Here we have explained about above HTML Document output.
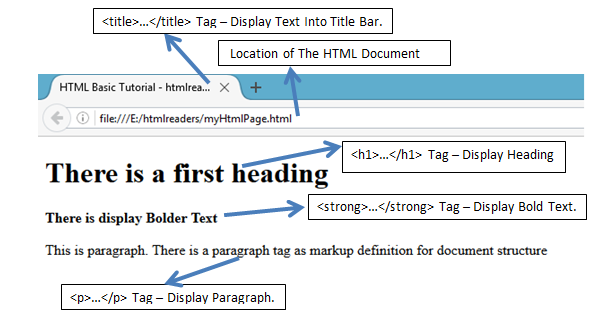
Explanation of an HTML document
The HTML document consists of basics individual HTML elements. Now we'll look at the explanation of the individual.
| Tags |
Description |
| <!DOCTYPE html>
|
The doctype. doctypes were meant to act as links to a set of rules that the HTML page had to follow to be considered good HTML, which could mean automatic error checking and other useful things.
However, these days no-one really cares about them, and they are really just a historical artifact that needs to be included for everything to work right. ><!DOCTYPE html> is the shortest string of characters that counts as a valid doctype; that's all you really need to know.
|
| <html></html> |
The <html> element. This element wraps all the content on the entire page, and is sometimes known as the root element.
|
| <head></head> |
The <head> element. This element acts as a container for all the stuff you want to include on the HTML page that isn't the content you are showing to your page's viewers. This includes things like keywords and a page description that you want to appear in search results, CSS to style our content, character set declarations, and more. You'll learn more about this in the next article in the series. |
| <title></title> |
This sets the title of your page, which is the title that appears in the browser tab the page is loaded in, and is used to describe the page when you bookmark/favourite it. |
| <body></body> |
The <body> element. This contains all the content that you want to show to web users when they visit your page, whether that's text, images, videos, games, playable audio tracks, or whatever else. |
| <h1></h1> |
|
| <strong></strong> |
|
| <p></p> |
|
Tags Based on their utility
We can differentiate tags based on the purpose they used. Basically we have three types here
Formatting tags
We manage the size of the font, underline part of the text, make the text bold etc by using tags like
, ,etc.
Tool to create your own basic HTML page with tags
Page Structure tags
Description , title , head , body etc are part of the page structure tags. They are part of the basic html page and does not directly affect the formatting of text or image.
Control tags
Form tags, Script tags, Radio buttons etc are part of the control tags